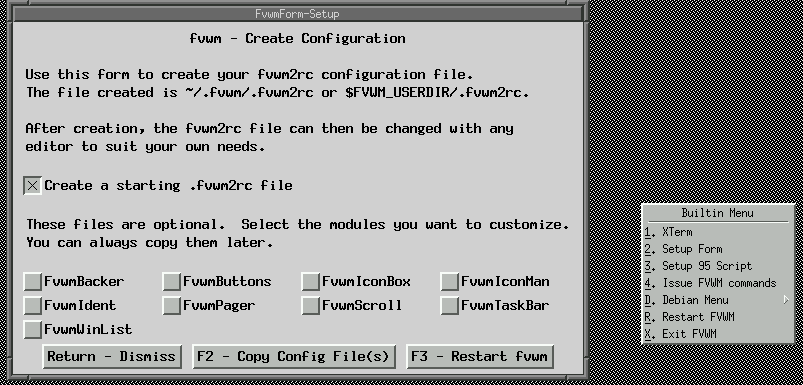
Figure 1: Fallback mode that Fvwm uses if no config files were found.
Fvwm! I'm sure some of you remember it more than others. You'd be forgiven for thinking that the window manager no longer existed. It is a shame that it has perhaps been over-shadowed by the newer, more glitzier desktop manager such as KDE and GNOME. I suppose that times have changed. People are after more eye-candy than even before, right? Well, not me. While it maybe true that we all like pretty things, often these things come with a sacrifice. The most noteworthy thing for me over the years has been the fact that in order to use KDE and GNOME you need a supercomputer with a lot of RAM.
But luckily this needn't be the case. What separates a window manager from a desktop environment is that window managers do not have integrated applications such as file managers and coherent little utilities to tweak the overall environment. Instead such utilities are external. The job of a window manager is just that; it manages windows.
Fvwm was originally started in 1993 by Robert Nation. It is based on code from 'twm' (Tom's Window Manager) which was at the time perhaps the only real window manager available to use. Frustrated with the lack of features he was used to, and the fact that twm was full of memory leaks, he took twm as a basis and hacked on it, the result was that Fvwm was kick-started, early 1993. Rob had already made a name for himself as the author of the popular terminal emulator rxvt, which is still used by a lot of people.
What I am intending, is to start from a minimal configuration of fvwm and work upwards, discussing how Fvwm works and operates, and how to configure it to do various things. There is a lot to Fvwm, so this won't be quick, but I hope it will be interesting, nevertheless.
Since Fvwm has been bundled with every distribution that I have used, the chances that you have it anyway. You should not use Fvwm1, since this is old and is no longer supported by the developers. Currently, the stable version is 2.4.18 while the unstable version is 2.5.10. Unlike many classifications of stable/unstable, I have found the unstable version of Fvwm to never crash, so I can recommend that you use this. Indeed, most of what I will talk about over the next few months will rely on some of the features in this version that are not in the stable one.
As a side note to using pre-compiled binaries, depending on the distribution used, some features that I may mention might not be compiled in. So it is perhaps advisable, if you wanted, to download the unstable version and compile it. There's plenty of information in the README and INSTALL files.
There are too many features to list. But as an overview of what Fvwm provides, here are some of the more interesting features available:
There is also session management support for those that want it.
Fvwm's configuration file is best done on a per user basis, although a global configuration is possible. When Fvwm loads it looks for the following files and will use the first one it finds:
If no files are found, Fvwm loads with a default builtin menu. This can initially be used to create a basic ~/.fvwm/.fvwm2rc file, as shown by figure 1.
You can then reload fvwm, and you'll then have a bare minimum config file. By default, Fvwm takes on the appearance of mwm and although mwm's style can be emulated completely, Fvwm's own internal style is to have raised borders and a raised title, as shown in figure 2.
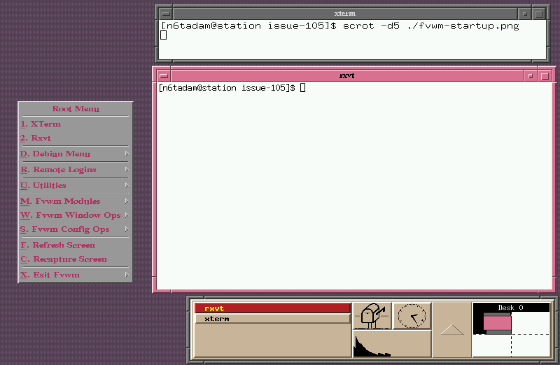
You may well be thinking yuck! and I wouldn't blame you. There's certain things about it that is hideous, I know. But everything you see in the screenshot is configurable. Of course, nothing is lacking in features that you wouldn't find in other window managers. There's menus, button bars, etc. Let's take a closer look at what a makes up a window.
A window, is the decorated part of the program. There are several characteristics to a window, some of which are obvious and some not so. Visually, the appearance of the window can can be configured. The structure of a typical window usually means it has the following:
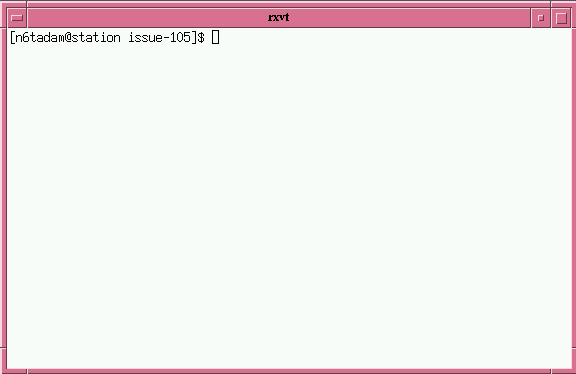
A popular configuration is to have three buttons on the title bar. The leftmost one when clicked, pulls down a menu of choice that can be applied to the window. This is more or less the same with how MS-Windows operates. The next button along from that (moving right) iconifies the window, while the button next to that one maximises the window (as seen in Figure 3).
Fvwm allows for up to a maximum of ten buttons on the window title. These can be pre-defined to perform any number of functions. I've yet to personally think of a reason why you would need to define all ten, but I'm sure some people do. There are two types of buttons that can be defined. Vector Buttons and pixmaps, the former of which are used by default. I'll come back to the differences later on, but for now we'll look at how the buttons are arranged and seen by Fvwm. As such, each button is numbered in turn.
+--------------------------------------------------------------------------+
| 1 3 5 7 9			   Title			 0 8 6 4 2 |
|--------------------------------------------------------------------------|
|									   |
Fig. 3 therfore shows buttons 1,4 and 2 have been defined. I mentioned earlier, vector buttons. These are "drawn" by Fvwm. Essentially, they're just coordinates of points that Fvwm draws lines between. You can see a huge list of vector definitions here. You can take the definitions and apply the to the various buttons as you see fit. The code for the buttons is defined within a decor. By default (as is the case here), if no decor has been defined, the builtin is used.
A decor is a definition set of characteristics that can be applied to windows. Typically, they're suited for defining all the attributes we've looked at so far.
AddToDecor   fDecor
 + BorderStyle Simple
 + TitleStyle	   -- Raised
 + ButtonStyle All -- Raised
 + AddButtonStyle 1 Vector 5 25x40@1 25x60@1 75x60@0 75x40@0 25x40@1
 + AddButtonStyle 2 Vector 4 50x25@1 75x75@0 25x75@0 50x25@1
 + AddButtonStyle 4 Vector 4 50x75@1 25x25@1 75x25@1 50x75@0
 + ButtonStyle	  1 - Clear MWMDecorMenu
 + ButtonStyle	  2 - Clear MWMDecorMax
 + ButtonStyle	  4 - Clear MWMDecorMin
This code can be placed inside the ~/.fvwm/.fvwm2rc file. This decor does a number of things. BorderStyle sets up the style of the border. The simple option tells Fvwm that you want the defaults. If you look closely at the border, you'll notice that the edges are cut into. These are the window handles that define how much edge you have to grab the window to resize it, move it, etc. TitleStyle can set a number of attributes, bit here it is being used to give the tilebar a raised look, and the same is done to the buttons with the ButtonStyle command. AddButtonStyle adds to a style already. Following that, the button number is specified (see diagram), and then the vector definitions that you can replace with your own.
One aspect you must be aware of is that if you define a new button to be added to the titlebar, you must give it a mouse-binding, otherwise it will not display. I won't be covering mouse bindings just yet, but for now you can locate in the ~/.fvwm/.fvwm2rc file, the following:
#   for the title bar buttons:
Mouse 0 1       A       Menu MenuFvwmWindowOps2 Close
Mouse 0 2       A       FuncFvwmMaximize
Mouse 0 4       A       Iconify
Adding your own definition is simple. Although nothing will be bound to the button, you can add below those definitions something like the following, replacing the number after "0" with the corresponding button number you have defined the vector for:
Mouse 0 0 A Nop
You'll have to restart fvwm for the changes to be visible.
There a are a huge number of options available to just these commands. For instance, you can define the Titebar to be flat, by defining a line:
TitleStyle -- Flat
If you add --flat to the end of your vector button definitions, the button takes on a sunken appearance by default, rather than raised. You can also define button styles based on state, i.e. one for ActiveUp and ActiveDown. Border styles can also be set, so that,rather than a raised border, you can have sunken or flat.
As I mentioned earlier, pixmaps can also be used, in place of vector buttons. The same rules apply about defining the mouse-bindings from earlier. These are .xpm files that you can define to replace the buttons with images of your own. The style is similar to the one just defined:
ButtonStyle 2 Pixmap my_pixmap.xpm
ButtonStyle 4 \
  ActiveUp   (Pixmap activeup.xpm) \
  ActiveDown (Pixmap activedown.xpm) \
  Inactive   (Pixmap inactiveup.xpm)
  ButtonStyle 4 \
  InactiveDown Pixmap inactivedown.xpm
Here, Button 2 remains the same throughout all states, but Button 4 uses a different pixmap depending on the state. The states of the buttons are thus:
To apply the decor that you create, you have to tell Fvwm about it. The following general line can be used, obviously replacing the name of the decor with whatever you called it. In the examples above it is fDecor:
Style * UseDecor fDecor
Obviously, this has been an extremely quick review of what a window is, and how to define the obvious things such as buttons and borders. There are a plethora of options that I have not, and probably cannot cover just with these alone. Although cumbersome, the man page for fvwm does contain it all, and includes a lot of options in addition to what I have mentioned. Play around and experiment with defining buttons and vectors.
Next month, we'll take a look at defining coloursets for windows, a look at menus, and some other style options.
Here's a list of resources that you should probably look at for more information:
FVWM's official site.man fvwm